By Shivam Das | November 1, 2026
A Roblox character can appear to walk across a bridge while the physics engine treats part of it as a wall. A vehicle can seem to float above a racetrack, or a doorway that looks wide enough can stop a player at an invisible edge. These are not necessarily rendering bugs. They can be collision-geometry problems: the invisible physical shape used by the engine does not match the mesh players see.
Roblox’s Tunable collision option gives creators more control over that mismatch, but a higher slider value is not a substitute for testing. The practical question is not “How do I make every hitbox perfect?” It is “Which objects need more accurate collision, how can I prove the change helps, and what is the performance cost?”
Quick answer: Select a MeshPart in Roblox Studio, set CollisionFidelity to Tunable, then adjust CollisionPrecision. Higher precision creates a closer, generally more expensive collision representation; lower precision creates a simpler, cheaper one. Test the collision visualization and real gameplay behavior on each important asset instead of automatically choosing the highest setting for every mesh.
Why collision QA matters more than a perfect-looking mesh
The visible mesh and the physical collision shape serve different jobs. The rendered mesh controls what a player sees. Collision geometry controls where characters, vehicles, projectiles, and other physics objects can move or make contact. A beautiful model can therefore behave badly if its physical representation fills a hole, rounds off a sharp edge, removes a narrow support, or creates a surface that is not where the art suggests it should be.
Roblox’s Creator Hub describes several collision-fidelity choices for MeshParts. Box uses a bounding box; Hull uses a convex hull; Default creates an approximate shape; PreciseConvexDecomposition offers a more detailed decomposition at a higher performance cost; and Tunable exposes a precision slider. The correct choice depends on the asset’s job, not simply its polygon count.

What Tunable changes — and what it does not
Roblox announced CollisionFidelity = Tunable on September 17, 2026. When a MeshPart is set to Tunable, a CollisionPrecision slider appears in Properties. Moving it upward asks for a more detailed collision decomposition; moving it downward favors a coarser, less expensive representation. The setting is made per MeshPart, allowing creators to spend precision on gameplay-critical objects rather than applying one expensive setting everywhere.
The slider is qualitative, not a percentage-accuracy meter. In the launch discussion, a Roblox Geometry Team representative explained that the low end corresponds to Hull-like behavior, while the high end aims for a near-exact decomposition that captures as much detail as possible when the mesh allows it. A value of 1 should not be advertised as “100% accurate.”
Roblox also says the initial precision is selected based on mesh size. Its guidance is to bring a MeshPart close to its intended size before switching it to Tunable. The Creator Hub’s current Meshes documentation describes the same size-aware default and the precision-versus-cost tradeoff.

A five-step collision test creators can repeat
1. Identify the gameplay consequence first
Before changing a property, write down what is going wrong. Is a player snagging on a doorway? Is a kart bouncing on a smooth-looking road? Does a projectile hit an invisible section? Does an avatar collide with decorative trim? A clear symptom makes it easier to tell whether a new collision shape actually fixed the problem.
2. Inspect the physical shape, not just the artwork
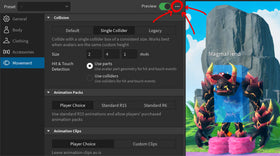
Open the Visualization Modes control in the upper-right area of the 3D viewport and enable the collision-fidelity view. Compare the physical boundary with the visible mesh. Roblox’s improved visualization workflow is designed to show the visual mesh and collision geometry together, adjust collision-display transparency, and filter by properties such as CanCollide, CanQuery, CanTouch, and Collision Groups.

3. Change one variable at a time
For a problem MeshPart, record its current fidelity, then try Tunable and adjust CollisionPrecision in small steps. Do not change the mesh scale, collision group, CanCollide setting, and precision slider all at once. If several properties change together, it becomes difficult to identify which one improved or damaged the result.
4. Test the interaction players actually perform
Walk through the doorway rather than merely looking at it. Drive the vehicle over the track at normal and high speed. Test the projectile from the angles players use. Check a character’s feet on steps, ramps, and narrow platforms. A collision preview is useful, but a playtest reveals whether the physical shape feels right in the experience.

5. Compare performance before rolling out widely
Test a representative group of assets before converting an entire environment. Roblox’s performance documentation advises using simpler collision options for objects that do not need detailed contact and disabling collisions where they are unnecessary. It also notes that collision geometry consumes memory even when an object’s collision is not central to gameplay. A more accurate hitbox is not automatically a better choice for every decorative prop.
Which assets deserve more collision precision?
- Doorways, arches, and narrow openings: Prioritize these when players must pass through gaps that a coarse collision shape could close.
- Vehicle roads and curved tracks: Test wheel contact and surface smoothness. Long, narrow, twisting meshes can remain difficult even at high precision.
- Combat and projectile targets: Use enough detail to make hits feel fair, but verify the result with actual projectile tests.
- Interactive machinery and puzzle objects: Preserve the contours players must touch, push, climb, or move around.
- Background decoration: Prefer a simpler shape, or no collision where appropriate, if players never need to interact with it.
One revealing example appeared in the September 17 Developer Forum discussion: a creator described a long, narrow racetrack mesh where even high Tunable precision did not fully solve floating and uneven vehicle contact. The creator said the workaround involved thousands of invisible wedges. A Roblox Geometry Team representative replied that memory limits can restrict decomposition detail on such meshes and suggested splitting the track into more manageable pieces as one possible approach. That is a useful warning: a slider cannot guarantee a perfect result for every topology.

Performance details that can change a creator’s workflow
Roblox said the first Tunable calculation for a complex mesh may take up to about five seconds. Once the precision levels are calculated and cached, moving the slider should feel smoother. The launch announcement also warned that applying Tunable to many complex MeshParts in bulk could temporarily pause Studio because the calculation was synchronous at that time. Roblox said it was working toward asynchronous processing and cloud-transcoded improvements; those statements were plans in the announcement, not a promise that every workflow is now instant.
The launch post also said resizing a Tunable mesh did not automatically recalculate its collision geometry at that time. Because collision behavior can change as an asset is resized or edited, inspect the collision preview again after scale changes and retest the object before publishing. Do not assume the collision shape has automatically adapted.
For large projects, use a small rollout: choose a few representative meshes, record their settings, compare behavior, and profile the experience. If a change does not improve the player-facing interaction, revert it. This is more reliable than setting every MeshPart to maximum precision and hoping the engine absorbs the cost.
A practical collision QA checklist
- Does the physical boundary match the gameplay-relevant parts of the visible mesh?
- Can players pass through intended openings without snagging?
- Do vehicles stay in contact with the intended road surface?
- Do projectiles and touch interactions register at expected locations?
- Have you checked
CanCollide,CanQuery,CanTouch, and Collision Groups? - Did you change only one relevant setting at a time?
- Did you test after resizing or editing the mesh?
- Have you compared the result in a real playtest and checked performance?
- Could a simpler Box, Hull, or custom invisible collision part solve the problem more efficiently?
What this means for Roblox developers
Tunable is a useful step because it gives creators more control over the tradeoff between collision accuracy and cost. Its biggest value is not that every object can now have the most detailed possible hitbox. It is that developers can choose where accuracy matters and make that choice visible, testable, and deliberate.
For a doorway, a vehicle track, or a combat-critical prop, collision quality can directly shape how fair and polished an experience feels. For a background rock or distant decoration, the same precision may add cost without improving the player’s experience. The best collision setup is therefore a designed budget, not a universal maximum setting.
Frequently asked questions
How do I enable Tunable collision geometry in Roblox Studio?
Select a MeshPart, open Properties, set CollisionFidelity to Tunable, and adjust the CollisionPrecision slider that appears.
Does a CollisionPrecision value of 1 mean perfect accuracy?
No. Roblox describes the slider as a qualitative control. The high end aims for a near-exact decomposition where possible, but it is not a guaranteed percentage-accuracy score.
Should every Roblox mesh use maximum collision precision?
No. Use more precision only where the gameplay interaction benefits from it. Background objects and non-interactive props may work better with simpler collision shapes or disabled collisions.
Why can a long racetrack still have collision problems?
Long, narrow, curved meshes can be difficult for decomposition algorithms, and memory limits may restrict detail. Splitting a very large mesh into smaller manageable pieces may help, but the result still needs testing.
Does Roblox automatically convert existing meshes to Tunable?
No. Roblox said the launch was non-breaking: existing MeshParts retain their existing collision geometry until a creator changes the setting.
Does resizing a Tunable mesh update its collision geometry?
Roblox’s September 2026 launch post said resizing did not automatically recalculate collision geometry at that time. Recheck the current preview and test after resizing rather than assuming it updates.
Can higher collision precision affect performance?
Yes. More detailed collision geometry generally costs more to compute and store. Roblox recommends choosing fidelity based on the object’s interaction needs and profiling the experience.
Official sources and further reading
- Roblox Geometry Team: Collision Geometry Workflow Improvements
- Roblox Creator Hub: Meshes and collision fidelity
- Roblox Creator Hub: Collisions
- Roblox Creator Hub: Improve performance
- Roblox Creator Updates
Related Roblox coverage: Roblox Studio’s Tunable Collision Geometry guide · Roblox Studio UIShadow Beta · Roblox Studio Package Overrides
Research and reporting by Shivam Das. Images in this article are credited to their original Roblox Developer Forum posts; older community examples are identified as illustrative references rather than screenshots of the 2026 Tunable interface.